


Christmas Cookies: Step by Step Instructions For Fabulous Cookies!

By Neely Bower
Dec. 15, 2021: I have always been an arts and crafts type of person, creating the latest in up-to-date Christmas decorations. However, when it came to Christmas cookies, I was a complete failure until I discovered that Judy Unis, a friend and Bronxville resident for many years, is an expert. She gave me her recipe for her cookies and icing and many tips on how to decorate. So I thought I would share these tips with you!
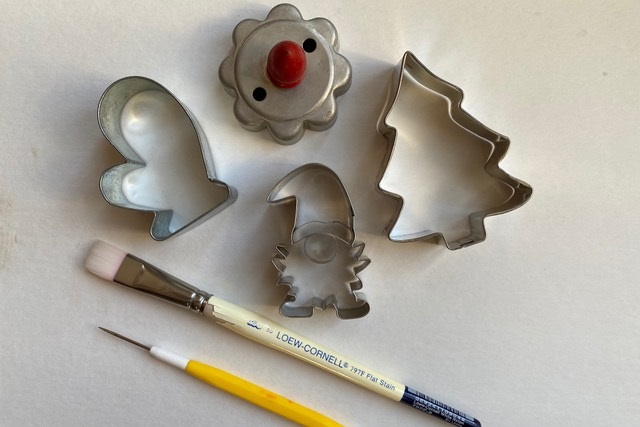
1) Assemble the tools you will need to start this project, cookie cutters, an artist paintbrush, and a stylist or toothpick.
2) Make the dough and icing. Here is the recipe:
Cookie recipe:
1 cup unsalted butter
1 cup granulated sugar
1 large egg
1 tsp baking powder
½ tsp salt
1 tsp pure vanilla extract
3 cups all-purpose flour
Preheat oven to 350°. Cream butter and sugar. Beat in egg and vanilla extract.
Sift together baking powder, salt and flour. Add flour all at once, if you have a Kitchen Aide mixer. If not, blend in last cup of flour by hand. The dough will be stiff. Put it on the counter and kneed it.
Divide dough into two balls. Wrap in plastic and chill for 30 minutes. Poll out to about 1/8 “ thickness on floured surface. Cut with cookie cutters. (Use large, off-set spatula to run under dough to prevent from sticking.)
Bake cookies on parchment lined half-sheet pan for about 15 minutes or until the edges start to turn brown. Cool. Makes about 3 ½ dozen, depending on the size.
Icing:
1 box of confectioners' sugar (4 cups)
6 tablespoons milk (3 oz.)
6 tablespoons light corn syrup (3 oz.)
1 teaspoon almond flavoring (or any other flavoring you like)
Thoroughly mix sugar and milk together. Add corn syrup and flavoring, Mix until combined. Divide and color with paste coloring. Cover to prevent drying until ready to use. Add 3 T of Royal icing mix for better results.
Outline icing:
1 cup cookie icing
4 to 6 heaping tablespoons powdered sugar
Mix until combined. Icing should be very stiff. Keep covered to prevent drying.
3) Roll out the dough cutting your favorite shapes, and bake. Put in an airtight container and move on to the icing. (This is the time-consuming part of Christmas cookies).
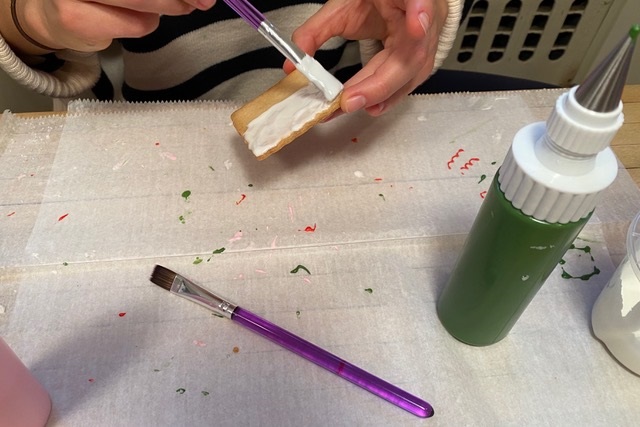
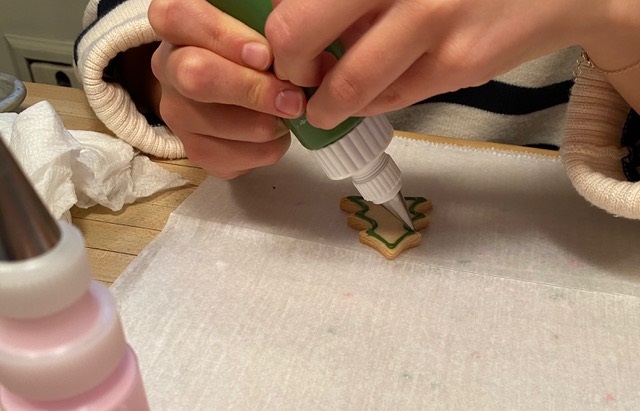
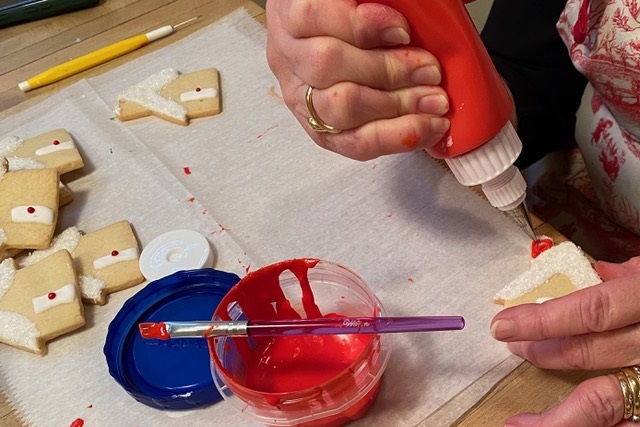
4) Put icing on the Cookies: One method for icing is, painting the icing on a cookie. Put icing in the middle of the cookie, and using an artist paintbrush, stroke out to the edge of each cookie. This method is quick and attractive. Another is a method called “flooding,” outlining the cookie, then filling in the center.
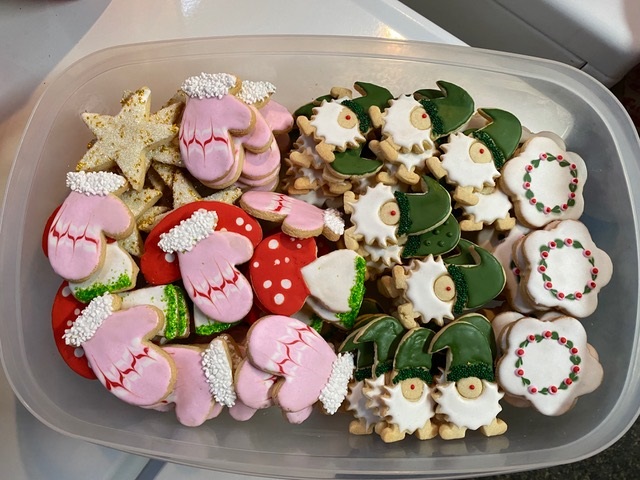
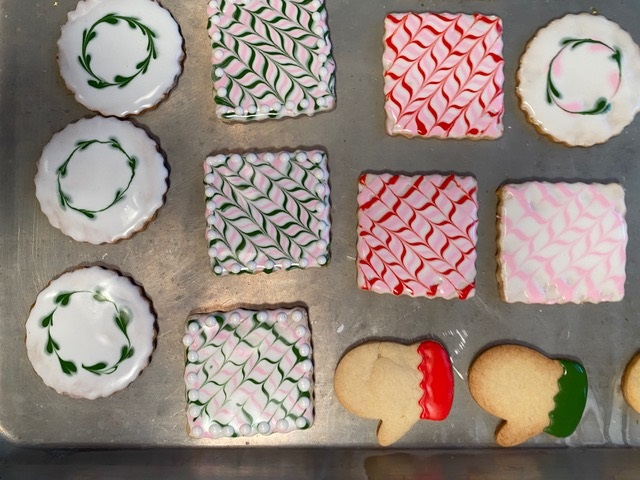
While the icing is wet, add dots of another color. Using a stylist or toothpick, stroke down for a surprising effect. See the photos below of mittens and square and round cookies.
You can also let your first application of icing dry, the n add another color for design. An example would be the Gnome (photo above), where you would do his hat, then his beard, then the sparkles on his hat. Let these dry between each application.
Find your decorating supplies online or at HomeGoods, Walmart, and JoAnn. You will need assorted sugars and Wilton food coloring
I have used this recipe for Judy’s cookies and icing for several years, and it seems to be tried and true. Have fun with many different shapes, and every year your skills will improve. It is not too late for this Christmas, so get baking.


Quick Links
Newsletter
MyhometownBroxnville reserves the right to monitor and remove all comments. For more information on Posting Rules, please review our Rules and Terms of Use, both of which govern the use and access of this site. Thank you.
The information presented here is for informational purposes only. While every effort has been made to present accurate information, myhometownBronxville, LLC, does not in any way accept responsibility for the accuracy of or consequences from the use of this information herein. We urge all users to independently confirm any information provided herein and consult with an appropriate professional concerning any material issue of fact or law. The views and opinions expressed by the writers, event organizers and advertisers do not necessarily represent those of myhometownBronxville, LLC, its officers, staff or contributors. The use of this website is governed by the Terms of Use . No portion of this publication may be reproduced or redistributed, either in whole or part, without the express written consent of the publisher.
Copyright © 2009 myhometownbronxville.com, All rights reserved.